主题定制
NexT风格
NexT提供了四种可选择的主题风格,打开主题配置文件themes/next/_config.yml,找到scheme关键字,选择你喜欢的风格即可:
scheme: Mist
# scheme: Muse
# scheme: Pisces
# scheme: Gemini
语言
在站点配置文件_config.yml中设置语言:
  language: zh-Hans     next5以下版本(include)
  language: zh-CN       next6以上版本(include)
首页折叠显示阅读全文按钮
第一种方法
在主题配置文件中找到auto_excerpt属性进行配置
auto_excerpt:
  enable: true #改写为true
  length: 150 #默认展示的高度
但是这种方法会打乱你的格式把文字挤成一团,不推荐
第二种方法
在你写 md 文章的时候,可以在内容中加上 <!--more-->,这样首页和列表页展示的文章内容就是 <!--more--> 之前的文字,而之后的就不会显示了。
这种方法可以保持原文格式,这也是我当前在用的方法
第三种方式
在文章的 front-matter 中添加 description,并提供文章摘录
---
title: Hexo blog定制进阶
date: 2019-07-16 15:15:39
categories: 奇技淫巧
tags: [web]
description: Hexo 的 Next 主题默认是首页显示你每篇文章的全文内容,那么要如何设置只显示部分呢?正如你现在看到的本篇文章,只显示到这里。
---
背景特效
Step 1 → Go to NexT dir
Change dir to NexT directory. There must be layout, source, languages and other directories:
$ cd themes/next
$ ls
bower.json  _config.yml  docs  gulpfile.coffee  languages  layout  LICENSE.md  package.json  README.md  scripts  source  test
Step 2 → Get module
Install module to source/lib directory:
$ git clone https://github.com/theme-next/theme-next-canvas-nest source/lib/canvas-nest
Step 3 → Set it up
Enable module in NexT _config.yml file:
canvas_nest:
  enable: true
  onmobile: true # display on mobile or not
  color: '0,0,255' # RGB values, use ',' to separate
  opacity: 0.5 # the opacity of line: 0~1
  zIndex: -1 # z-index property of the background
  count: 99 # the number of lines
记得在.gitignore 中添加
!source/lib/canvas-nest/
设置favicon图标
- 选择一个favicon制作网站完成制作,例如:比特虫 ,制作一个1616,一个3232的;
- 两个不同尺寸大小的文件,重名为favicon-16x16-next.ico和favicon-32x32-next.ico;
- 将重命名的两个图片文件放到博客目录下的themes/next/source/images中, 更新主题配置文件相关路径
favicon:
  small: /images/favicon-16x16-next.ico
  medium: /images/favicon-32x32-next.ico
底部版权信息
在7.x中版权声明设置关键词有所更新,不再是post_copyright, 在主题配置文件中修改
creative_commons:
  license: by-nc-sa
  sidebar: true
  post: true
  language: zh-CN
文字居中 & 图片大小
因为markdown原生语法缺乏对此需求的相关支持,这里直接使用html tag & css样式
- 文字居中
<center><p>《日常》,京都动画</p></center>
- 图片大小
<img src="./我们所经历的每个平凡的日常,也许就是连续发生的奇迹/1563926229881.jpg" width = "800" alt="日常" align=center />
效果见这篇blog
搜索功能
安装搜索插件: hexo-generator-searchdb
npm install hexo-generator-searchdb --save
在站点配置文件_config.yml中添加
search:
  path: search.xml
  field: post
  format: html
  limit: 10000
在主题配置文件themes/next/_config.yml中搜索Local search,设为true
# Local search
local_search:
  enable: true
打赏功能
只需要 主题配置文件 中填入 微信 和 支付宝 收款二维码图片地址 即可开启该功能。
reward_settings:
  # If true, reward would be displayed in every article by default.
  # You can show or hide reward in a specific article throuth `reward: true | false` in Front-matter.
  enable: true
  animation: true
  comment: 请我喝一杯咖啡

reward:
  wechatpay: /images/wechatpay.png
  alipay: /images/alipay.png
  #bitcoin: /images/bitcoin.png
评论功能
Disqus
国外用户首选,国内会因为big brother的原因无法访问
去至官网注册, 注意记下分配的shortname 然后回到主题配置文件
# Disqus
disqus:
  enable: true
  shortname: https-zephyrich-github-io
  count: true
  lazyload: false
重新部署则disqus已经集成
Valine
缺点:无后端实现,缺乏邮件提醒评论管理之类的功能 Valine官方文档 Valine github Valine-Admin
Valine is a fast, simple & efficient Leancloud based no back end comment system.
Create an account or log into LeanCloud, and then click on the bottom left corner to create the application in dashboard.
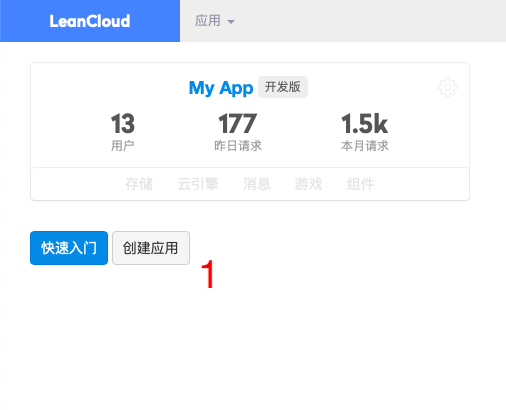
Go to the application you just created, select
Settings -> Apply Keyin the lower left corner, and you will see your APP ID and APP Key.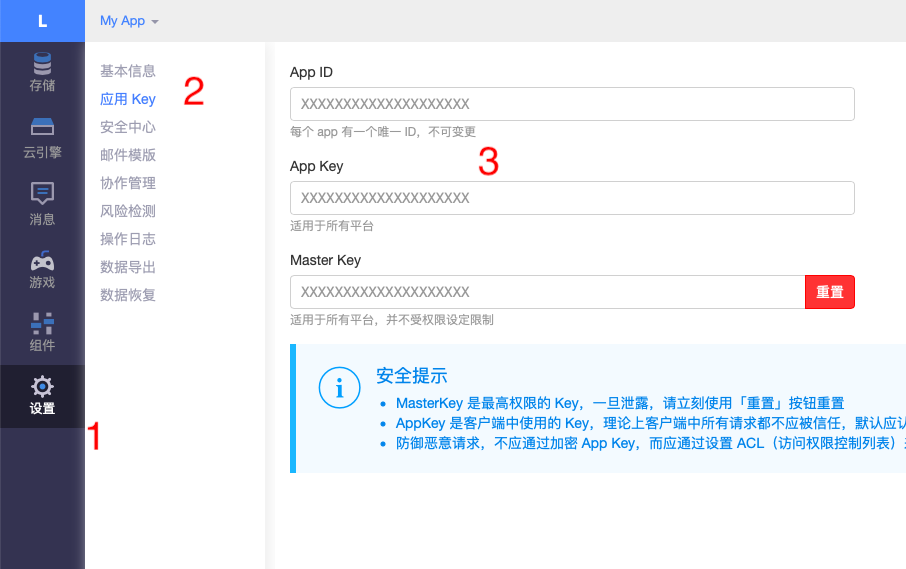
Set the value
enabletotrue, add the obtained APP ID (appid) and APP Key (appkey), and edit other configurations invalinesection in the theme config file as following:
# Valine
# You can get your appid and appkey from https://leancloud.cn
# more info please open https://valine.js.org
valine:
  enable: false # When enable is set to be true, leancloud_visitors is recommended to be closed for the re-initialization problem within different leancloud adk version.
  appid:  # your leancloud application appid
  appkey:  # your leancloud application appkey
  notify: false # mail notifier , https://github.com/xCss/Valine/wiki
  verify: false # Verification code
  placeholder: Just go go # comment box placeholder
  avatar: mm # gravatar style
  guest_info: nick,mail,link # custom comment header
  pageSize: 10 # pagination size
  visitor: false # leancloud-counter-security is not supported for now. When visitor is set to be true, appid and appkey are recommended to be the same as leancloud_visitors' for counter compatibility. Article reading statistic https://valine.js.org/visitor.html
文章加密
通过npm插件hexo-blog-encrypt可以实现加密功能,中文文档
你可以查看 Demo Page
所有的密码都是 123
安装:
npm install --save hexo-blog-encrypt- 在 _config.yml添加
# Security
##
encrypt:
    enable: true
- 给文章添加密码
---
title: hello world
date: 2016-03-30 21:18:02
tags:
    - fdsfadsfa
    - fdsafsdaf
password: "replace-with-your-own-password"
abstract: Welcome to my blog, enter password to read.
message: Welcome to my blog, enter password to read.
---
添加看板娘
npm插件 hexo-helper-live2d 源码 model源码 demo
隐藏首页部分文章
找到themes ▸ next ▸ layout文件夹下的index.swig文件 定位修改post_template.render 修改成以下代码:
    {% for post in page.posts %}
        {{ post_template.render(post, true) }}
    {% endfor %}
为:
    {% for post in page.posts %}
      {% if post.visible !== 'hide' %}
        {{ post_template.render(post, true) }}
      {% endif %}
    {% endfor %}
在新的post中添加visible字段来控制是否首页显示
---
title: post title
date: 2019-04-23 12:24:19
tags:
    - hexo
categories:
    - hexo
visible: hide
---